gazebo 플러그인을 통해 gazebo에 각종 센서를 불러 올 수 있고, 센서 정보를 ros topic으로 변환해
센서 데이터를 ros에서 사용하거나 RVIZ 등의 시각화 툴을 이용해 topic으로 보내진 데이터를 시각적으로 확인할 수 있다.
가제보상의 로봇에 depth camera 센서를 플러그인 하고,
rviz로 depth 정보를 시각화한 depth image등을 볼 수 있게 하자.
*정확하지 않은 내용이 있을 수 있음 ;;;;
1. depth camera plugin 코드 추가
Gazebo plugins in ROS 페이지의 depth camera(Openni Kinect) 부분의 plugin 코드이다.
자세한 내용은
ROS Depth Camera Integration 페이지에서 찾아볼 수 있다.
  <sensor name="${link_name}_camera" type="depth">
    <update_rate>20</update_rate>
    <camera>
      <horizontal_fov>1.047198</horizontal_fov>
      <image>
        <width>640</width>
        <height>480</height>
        <format>R8G8B8</format>
      </image>
      <clip>
        <near>0.05</near>
        <far>3</far>
      </clip>
    </camera>
    <plugin name="${link_name}_controller" filename="libgazebo_ros_openni_kinect.so">
      <baseline>0.2</baseline>
      <alwaysOn>true</alwaysOn>
      <updateRate>1.0</updateRate>
      <cameraName>${camera_name}_ir</cameraName>
      <imageTopicName>/${camera_name}/color/image_raw</imageTopicName>
      <cameraInfoTopicName>/${camera_name}/color/camera_info</cameraInfoTopicName>
      <depthImageTopicName>/${camera_name}/depth/image_raw</depthImageTopicName>
      <depthImageInfoTopicName>/${camera_name}/depth/camera_info</depthImageInfoTopicName>
      <pointCloudTopicName>/${camera_name}/depth/points</pointCloudTopicName>
      <frameName>${frame_name}</frameName>
      <pointCloudCutoff>0.5</pointCloudCutoff>
      <pointCloudCutoffMax>3.0</pointCloudCutoffMax>
      <distortionK1>0.00000001</distortionK1>
      <distortionK2>0.00000001</distortionK2>
      <distortionK3>0.00000001</distortionK3>
      <distortionT1>0.00000001</distortionT1>
      <distortionT2>0.00000001</distortionT2>
      <CxPrime>0</CxPrime>
      <Cx>0</Cx>
      <Cy>0</Cy>
      <focalLength>0</focalLength>
      <hackBaseline>0</hackBaseline>
    </plugin>
  </sensor>
위 코드를 로봇 모델이 있는 STL파일, 또는 world파일에 붙여넣기 한다.
Drok2로봇의 경우 catkin_ws/ src/ Drok2_simulator/ worlds/ empty world 파일에서 lydar센서 플러그인 자리에 붙여넣기 하면 될 것이다.
{ link_name }_camera -> camera
{ link_name }_controller -> camera_plugin
{ camera_name } -> camera
{ frameName } ->camera_link
으로 이름을 넣어준다.
URDF 파일에서 플러그인 할 경우
<gazebo reference="${link_name}">
. . . . .
</gazebo>
태그 안에 코드를 넣어주어야 하는데,
이때 ${link_name} 자리에는 반드시 센서를 달 링크 이름으로 해 주어야 한다.
2. gazebo실행, rviz에서 depth image 확인
다음 명령으로 gazebo 실행
~$ roslaunch drok2_simulator drok2_gazebo.launch

다음으로 RVIZ를 실행한다.
~$ rviz
RVIZ에서 왼쪽 하단에 있는 Add 탭을 누르면 다음과 같은 창이 뜬다.
By display type과 By topic이 있는데, 토픽으로 보내지는 이미지를 받을 것이기 때문에 By topic으로 들어간다.

By topic에서 /camera/depth/image_raw/Image 를 선택하고 OK를 누른다.

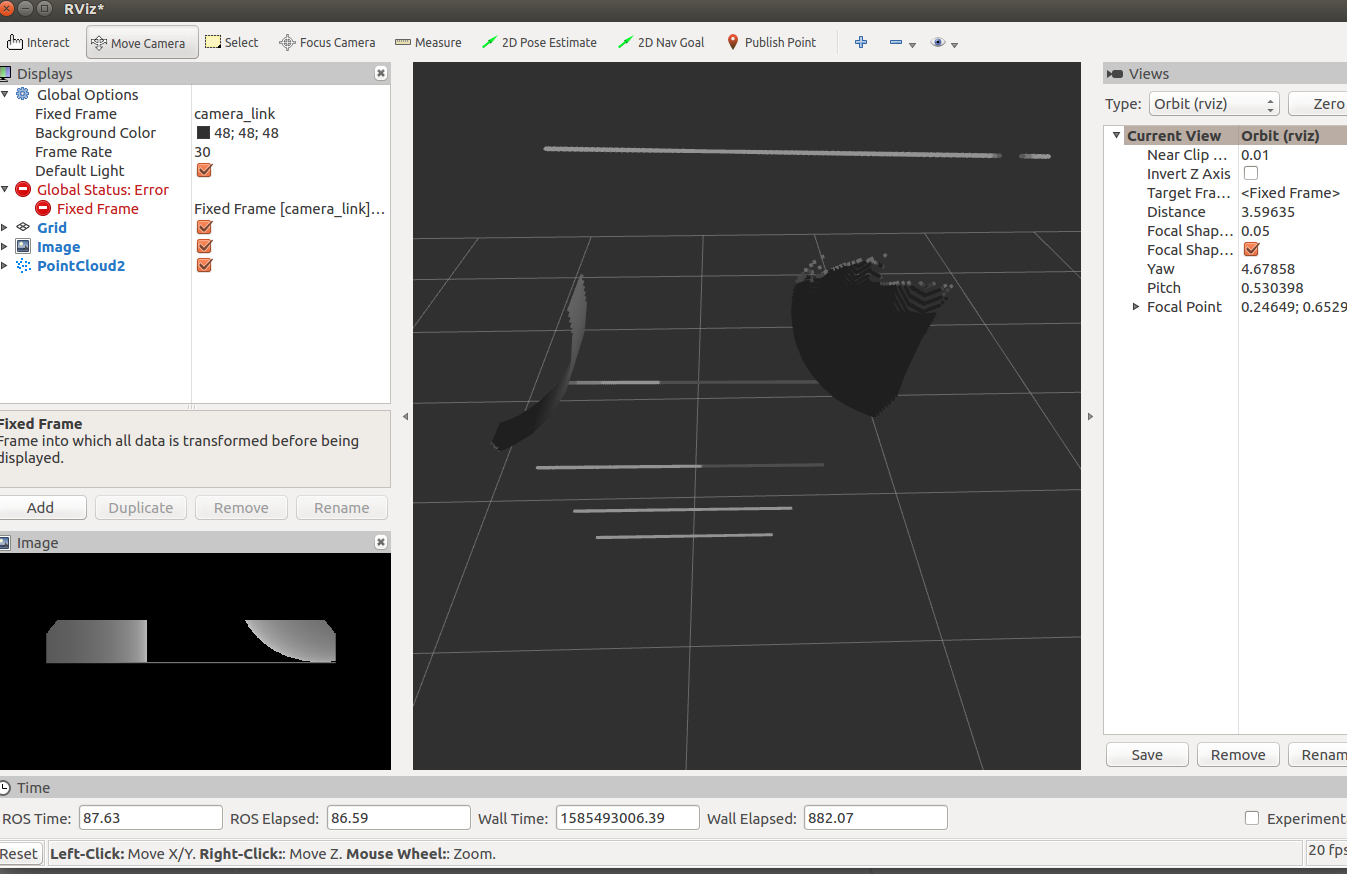
다음과 같은 Image 창이 추가 된다. 현재 로봇이 있는 gazebo 공간에 바닥면 말고는 아무것도 존재하지 않기 때문에 image 창에 가로줄만 나타나는 것을 볼 수 있다.

이제 Gazebo 에서 다음과 같이 로봇 주위에 물체들을 생성시켜보자. 가제보의 위쪽 바에 물체 생성 버튼이 있다.

아래쪽의 삼각형 play 버튼을 누르고 다시 RVIZ의 image 창을 확인해보자.

depth 이미지가 생긴것을 볼 수 있다.
다시 Add -> By topic에서 /camera/depth/points/PointCloud2 를 선택 후 OK를 눌러보자.

depth 카메라의 거리 정보를 아래와 같이 3차원 형상으로 시각화해서 볼 수 있다.
참고링크
http://gazebosim.org/tutorials?tut=ros_gzplugins
Gazebo : Tutorial : Gazebo plugins in ROS
Tutorial: Using Gazebo plugins with ROS Gazebo plugins give your URDF models greater functionality and can tie in ROS messages and service calls for sensor output and motor input. In this tutorial we explain both how to setup preexisting plugins and how to
gazebosim.org
http://gazebosim.org/tutorials/?tut=ros_depth_camera
Gazebo : Tutorial : ROS Depth Camera Integration
Use a Gazebo Depth Camera with ROS Introduction In this tutorial, you'll learn how to connect a Gazebo depth camera to ROS. The tutorial consists of 3 main steps: Create a Gazebo model that includes a ROS depth camera plugin Set up the depth camera in Gaze
gazebosim.org
'drok > drok2 패키지' 카테고리의 다른 글
| gazebo에서 3D맵 만들기 (7) | 2020.03.26 |
|---|---|
| Drok2 3D 모델을 gazebo와 연동하기 (0) | 2020.03.19 |

